

Beginner Combos
L > M > H > 2H > 9 jc > j.M > j.H > j.S2
2H will whiff at max 5H range
Solo
Midscreen
2H > j.L > j.M > j.H > j.6S2~4S2 > j.S2 > j.2S1
You can swap the j.S2 > j.2S1 ender for:
- j.S1 > S1 + S2 (577 damage – 3 Bars)
- L + S2 (407 damage – 1 Bar)
2H > j.M > j.H > j.S1 > j.66 > j.H > j.6S2~4S2 > j.S2 > Ender
You can end up in the corner if the enemy forward rolls.
Your options for enders:
- 44 > dl.6M + H (You have enough time to backdash once and back throw if they roll forward.)
- L + S1 (465 damage – 1 Bar)
M > H > S1~S1 > j.6S2~4S2 > j.S2 > j.2S1 > j.66 > j.H > Super 2
- Simple day 1 combo. j.6S2 might not hit depending on distance.
- Can backthrow the enemy escaping with a forward roll.
starters > 6S2 > 7S2 > j.S2 > j.2S1 > j.66 > j.

j.
Starters:
- M > H
- H
- 2M > H
- j.2H > M > H
Enders:
- j.S2 does 446 damage with a M > H starter. +63 frame advantage.
- j.S2(1) > Super 2 does 569 damage with a M > H starter. +16 frame advantage.
- j.S2(1) > Ultimate does 711 damage with a M > H starter. +42 frame advantage but position reset to almost full screen.
( please note that, after testing, the resulting damages were lower and the video did not execute the combo ending as mentioned )
5M > 5H > 6S2 > 7S2 > j.S1 > j.66 > j.
- 7S2 > j.S1 Needs a small delay for Ahri to cross the opponents after 7S2 , delay can be omitted for a sideswap
- j.66 > j.
- 66 > 5H Input dash immediately upon landing, don’t cancel the dash to 5H right away, delay slightly to get distance from the dash.
- j.M > j.6S2 Must reach the corner by j.6S2 if not end in j.3S2.
- j.2S2 > 7 jc > j.2S1 The j.2S1 must be minimum height, and the juggle height must be sufficiently high when j.2S2 hits.
- 66 > 5M > 5H may be used in place of 66 > 5H for 5 more damage and increased juggle height if the opponent fell too low during j.66 > j.
Enders:
- 2T ( partner aircombo ) instead of S2
- Super 2 after the 2nd hit of S2 for 600 damage
Corner
M > H > S2 > S1 > S1 > S1 > dl.j.66 > j.H > M > H > 2H > j.M > j.H > j.S1 > j.S2 > Super 1
You need a slight delay between the third S1 and the air dash j.H in order for the grounded M to connect. Its a pretty big hitbox though so it’s not overly difficult.
M > H > S1 > S1 > S1 > j.66 > j.H > M > 2H > j.M > j.H > j.3S2 > 2L > M > H > 8S2 > j.2S2 > Super 1
Same combo as above, but omits the early S2 to instead extend with an OtG pickup at the end.
M > H > S2, j.2S1 > j.66 > j.H > H > 2H > j.M > j.H > j.6S2 > j.4S2 > j.S1 > j.S2 > Super 1
Does an OTG pickup with j.2S1. Delay the 66 > j.H very slightly after doing the OTG pickup. Can go into 2T instead of 2H to swap to your other Character for the combo finish.
M > H > S1 > S1 > S1 > j.66 > j.H > j.3S2 > M > H > 2H > j.M > j.H > j.6S2 > j.4S2 > j.S1 > j.S2 > Super 1
Can confirm from M > H > S1 corner blockstring. The farther away you are for M > H, the longer you need to delay the j.H after j.66. Can go into 2T instead of 2H to swap to your other Character for the combo finish.
5M > 5H > 6S2 > 7S2 > j.S1 > j.66 > j.
- Corner specific version of her hard Midscreen combo that uses held Orb of Deception which leads to better damage and Stalking Dart Oki.
- Hold down Super 1 so Orb of Deception goes through opponent
- The 6 is important to walk yourself out of the corner before your opponent is low enough for you to land S2.
Team
Blitzcrank
Starter > 5H > 6S2 > 7S2 > j.S1 > j.66 > j.
- Double Down Fuse
- can be done in against corner if you do 8S2 instead of 7S2 towards the start of the combo, giving you the side switch
- You must do the tag right as you do super 2 with arhi, or else you wont be out of recovery frames before the super ends

Ekko
M > H > S1 > T > 66 > M > H > S1 > T ( to Ekko ) > 66 > M > H > S2 > S2 > L > H > S2 > 2S2 > 9 jc > j.[S2] > L > M > H > 6S1 > 2S2 > 6S1 > (Super 1 > ) Ultimate

Vi
2M > 5H > 6S2 > 7S2 > j.S1 > 66 > j.[H] > 66 > M > H > 9 > M > j.2H > j.H > 9 > j.L > j.M > j.6S2 > j.S1 > j.2S2 > 7 > j.2S1 > j.3S2 > S2 > T > (Super 2) > T ( to Vi ) > 5H > [S1] ( max ) > S2 ( Mashed ) > (Super 2)
- Double Down Fuse
- DD/Vi specific ender for Ahri’s hard midscreen rejump combo, with an additional 5M for consistency after microdash
- Steer Hyper Spirit Rush slightly upwards and tag into Vi as soon as her assist hits to allow [S1] to hit fully charged.
- Cancel Denting Blows into Super before the wallbounce hits.
- Omitting Hyper Crater Maker deals 702 damage and gives Limit Strike. Opponent can air tech but cannot cross up on a forward air tech. Any air tech that is not backwards is dead to air throw into 2S2.
- Ending with Cease and Desist instead deals 972 damage, effectively TODing partnered characters in most situations and leaving any survivors to guess for their life or die to chip from mashed Denting Blows S2 or Footwork strings.
2M > 5H > 6S2 > 7S2 > j.S1 > 66 > j.[H] > 66 > H > 9 > M > j.2H > j.H > 9 > j.L > j.M > j.3S2 > (Super 1) ( Held ) > 8 > j.M > j.6S2 > j.6S2 > j.S2 > 4T > (Super 2) > T ( to Vi ) > 5H > [S1] ( max ) > S2 ( Mashed ) > (Super 2)
- Double Down Fuse
- DD/Vi Ahri double super routing into the same Vi ender as above.
- Cannot 5M after microdash or Super 1 > 8 > j.M cannot connect.
- Steer Hyper Spirit Rush slightly upwards and tag into Vi as soon as it connects to allow [S1] to hit fully charged.
- Cancel Denting Blows into Super before the wallbounce hits.
- Omitting Hyper Crater Maker deals 805 damage and gives Limit Strike. Opponent can air tech but cannot cross up on a forward air tech. Any air tech that is not backwards is dead to air throw into 2S2.
- Ending with Cease and Desist instead deals 1076 damage, TODing all but the stoutest of partnered characters when completely healthy. Survivors must parry or pushblock out of a chip sequence.
- Opponents with 30% burst or less cannot escape.
Yasuo
Starters > 6S2 > 7S2 > j.S2 > j.2S1 > j.66 > j.[H] > 2T > Partner Ender
2T (Tag Launcher) has only 9 frames of start-up compared to the 15 of 2H, the timing for j.[H] > 2T is easier than Ahri’s solo combo with the same structure.
Starters:
- M > H
- H
- 2M > H
- j.2H > M > H
Partner Enders:
- Most characters should be able to do a basic j.L > j.M > j.H into a Super or ground/wall ender after the Tag Launcher.
Example Ender with Yasuo:
- j.L > j.M > j.H > j.2H > j.S1 > j.S1 > j.S2 > 44 > L + S2
557 damage with M > H starter. You’ll have to adjust the 44 > L + S2 part depending on whether or not the combo ends at the corner.
Notation Help
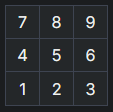
Disclaimer: Combos are written by various writers, so notation may differ slightly from this notation. For more information, see ControlsNumbers 1-9 represent directions on a numpad.


X, Y = "X" input is linked into "Y", meaning "Y" is done after "X's" recovery period.
X+Y = Buttons "X" and "Y" must be input simultaneously.
X/Y = Input "X" or "Y" can be used.
dl.X = There should be delay before inputting "X".
w.X or X(w) = Attack "X" should whiff and not hit the opponent.
j.X = Button "X" is input while jumping or in the air.
jc = Jump cancel the previous action. Occasionally omitted due to being obvious. Will occasionally be notated with 7/9 to indicate backwards/forwards.
sj = Perform a superjump, which is performed by inputting 2~8.
IAD = Instant Air Dash.
(X) = Input "X" is optional. Typically the combo will be easier if omitted.
(X)xN = Repeat "X" N times.
]X[ = Input "X" is released. Also called Negative Edge. Will only appear if a button is previously held down.
{X} = Button "X" should only be held down briefly to partially charge the attack, instead of the full charged version.
X(#) = Attack "X" should only hit # of times.
X~Y = This notation has two meanings.
- Use attack "X" with "Y" follow-up input.
- Input "X" then within a few frames, input "Y". Usually used for option selects or kara cancels.
CH = The first attack must be Counter Hit.. Indicated by an "Interrupt!" pop-up down left.
OTG = The following move hits the opponent Off The Ground.